A blogger’s approach to photography • © James Conner, all rights reserved • Contact
Using a photograph of the Moon to determine the focal length of a lens involves two steps. First, the Moon’s angular diameter is used to determine the horizontal angle of view of the lens. Second, the AOVh is used to calculate the focal length.
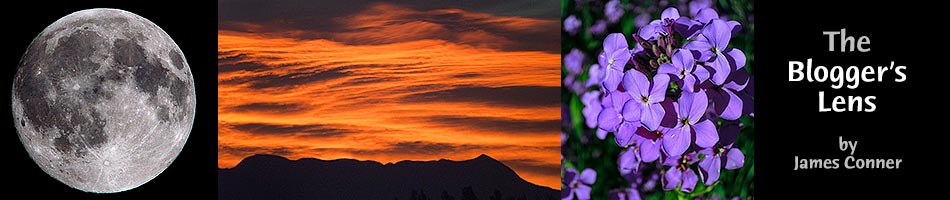
For this exercise, we’ll use an image of the Moon I made at 0200 MDT on 14 May 2014 from my backyard in Kalispell using a Nikkor 300mm f/4.5 Ais lens on a Nikon DX DSLR.
A full-frame digital SLR’s sensor is 36mm wide by 24mm high. If you have an APS DSLR, such as a Nikon D5000, you’ll need to look up the sensor format’s size (Wikipedia page). Nikon’s DX sensors are 23.6mm wide, Canon’s are usually 22.3mm wide. Your image processing application will report the width of your image/sensor in pixels. I used a 12-megapixel DSLR with a 23.7mm-wide sensor that has 4,288 pixels along the horizontal axis.
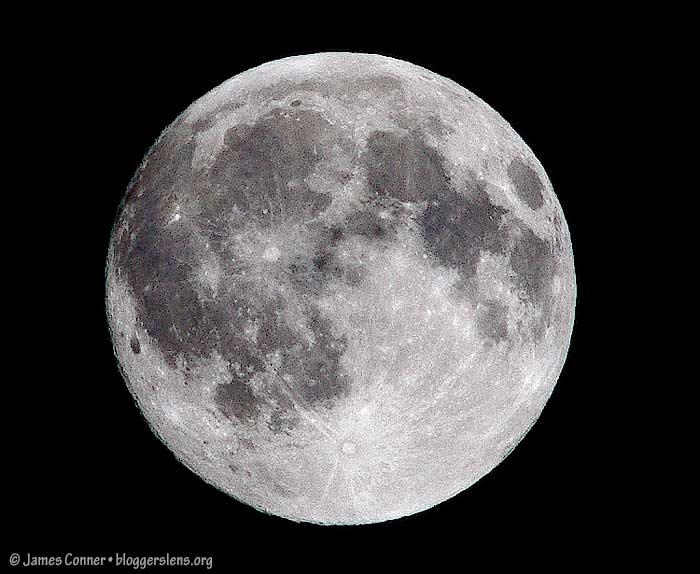
The Moon subtends approximately half a degree of arc as seen from the Earth’s surface. But we need the actual value for this exercise, which requires our making a virtual visit to the U.S. Naval Observatory and its page for the topographic configuration of major solar system bodies. I recommend an interval of one hour. Here’s what the output looks like:
The Moon’s diameter is in minutes and seconds of arc, which must be converted to decimal degrees (one degree = 3,600 seconds of arc, one minute = 60 seconds of arc). Convert the minutes to seconds, add seconds, and divide the sum by 3,600. The UNSO’s application produces values for UTI, or Greenwich Mean Time, so you must subtract six hours to convert the time to Mountain Daylight Time. Three decimal places is plenty of precision.
At the time I made my image of the Moon, it subtended 31 minutes and 59.5 seconds of arc. Converting that to degrees:
((31*60)+59.5)/3,600 = 0.533 degrees
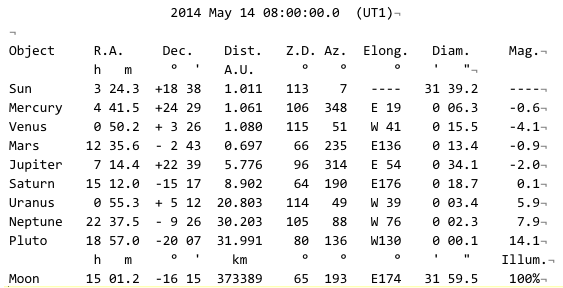
Boxing the Moon. Open your image of the moon in an image processing application. Don’t sharpen the image or otherwise manipulate it. Now, drag image guides until they are tangent to the moon on the right, left, top, and bottom of the image, boxing the Moon. Increasing the screen size to 200 or 300 percent may help, but the edge of the Moon won’t be perfectly sharp, so you’ll have to exercise some judgment. A pixel either way won’t make a significant difference. If the difference between the vertical and horizontal values is more than a couple of pixels, repeat the measurement until you obtain consistent results.
Measure the vertical and horizontal sides of the box. I used the ruler tool in Photoshop CS6. Ideally, the vertical and horizontal values will be identical, but if they’re not, take the average. You now have the diameter of the Moon in pixels (Mp). In the image below, the average is 509.5 pixels.
Calculate the horizontal angle of view in Moon diameters. Divide the width in pixels of your sensor (Sp) by the width in pixels of the Moon to obtain your lens’ angle of view in Moon diameters (Md):
Md = Sp/Mp
4288px/509.5 = 8.42 Md
Convert the AOVh to degrees by multiplying Md times the Moon’s angular diameter:
8.42 Md * .533° = 4.49°
Just one step remains: converting AOVh of your lens to its focal length in millimeters. We do that with this equation:
FL = (Sw/Tan(AOVh/2))/2
Where FL is focal length in millimeters; Sw is the horizontal sensor width in millimeters; AOVh is the horizontal angle of view we just calculated.
Beware of the tangent trap. Be sure to use a good scientific calculator, such as a Texas Instruments or Hewlett Packard calculators. If you’re using a spreadsheet or a datasheet in a graphing application, be sure to use the double-precision floating point mode for this calculation. Otherwise, your tangent calculations might not be trustworthy for angles smaller than 10 degrees. (And, make sure your calculator or spreadsheets is calculating in degrees, not radians.)
Running the numbers for my AOVh of 4.49°:
(23.6mm/tan(4.49°/2))/2 = 301mm
Run a reality check on your results by calculating the horizontal angle of view for the marked focal length of your lens:
AOVh = 2 * arctan(Sw/(2*FL)
The result for my 300mm Nikkor: 4.50°
The calculated AOVh should be very close to your experimentally determined AOVh. If it’s not, you might have made a mistake in your experimental determination of the AOVh of your lens — or, the actual focal length of your lens might differ from the marked value. But how do you know which is the correct explanation for the difference?
If the difference is very small, less than a percent, it’s most likely due to experimental error. My experiments resulted in a focal length of 301mm for my Nikkor 300mm f/4.5 Ais lens. That one millimeter difference probably is due to experimental error and/or sample variation. In future calculations using this lens, I’ll use the marked focal length of 300mm, but add a footnote reporting the measured value of 301mm.
In addition to the Nikkor 300mm f/4.5 lens, I photographed the Moon with an old Nikkor Q 200mm f/4 lens; the 300mm lens with a 1.5X Kenko teleconverter; and a Sigma 400mm f/5.6 APO Ais lens. The results are in the table below.
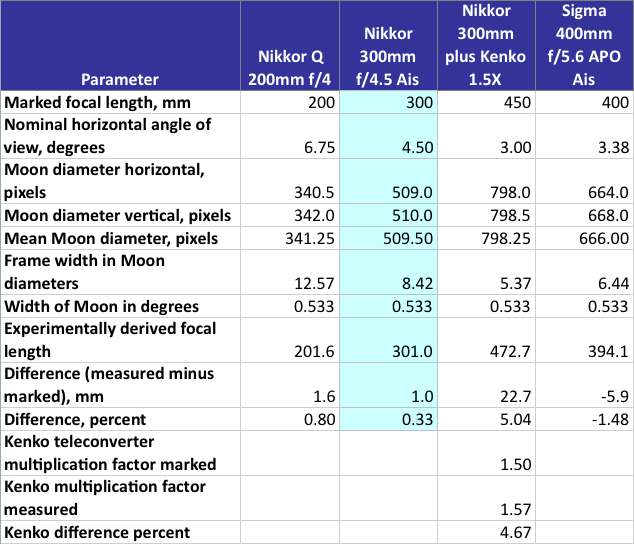
The old 200mm lens came in at 201.6mm, which is pretty close to the nominal value, but my Kenko 1.5X teleconverter was another story. My experimentally derived value was 1.57X, and I suspect it may be sold, possibly under different brand names, as a 1.6X teleconverter. Assuming the experimental value is correct, the proper exposure compensation is now one and one-third stop, so my 300mm f/4.5 now becomes a 472mm f/7.1, which may be too dark a lens for phase detect focus confirmation with my DSLR. Fortunately, this combination requires a tripod, so I can use live view to focus the lens.
Knowing a lens’ true angle of view and focal length is useful for determining the size or distance of objects in a photograph. The method in this post produces values for the lens at infinity focus. A target of known width can be substituted for the Moon for closer object distances. This would be a good project for a photography or astronomy club, which could set up a target range and hold lens measurement workshops.